Understanding OAuth 2.0: What It Is and How It Works
Learn the core concepts of OAuth 2.0 in a simple and structured way. You'll learn about its roles, flows, access tokens and how it enables secure delegated access to APIs and resources. Whether you're a beginner or someone looking to strengthen your foundation, this guide will help you understand how OAuth 2.0 actually works under the hood without skipping important technical details.

Introduction
While browsing the internet, you’ve probably come across a feature that lets you log in using your social media accounts. For those who are unfamiliar, this functionality uses a framework called OAuth.
If you’ve ever clicked on “Login with Google” or seen a prompt saying “Allow access to my account,” you’ve already interacted with OAuth even if you didn’t realize it. It’s a modern authorization framework designed to simplify login and access processes.
But as security enthusiasts, what matters more is that OAuth also introduces a new attack surface.
Before we get into those vulnerabilities, this blog will help you first understand what OAuth 2.0 is and how it works under the hood in web applications. This foundational understanding is essential before diving into the more advanced security aspects.
So let’s get started.
What is OAuth 2.0?
OAuth 2.0 is an authorization framework that enables a third-party application to access a user’s resources without ever exposing the user’s credentials.
One of its main advantages is that it lets users decide exactly which data they want to share, instead of giving the full control of their account to the third-party application.
Note that it is an authorization framework and NOT an authentication framework.
Key Terminologies
Before we dive into how OAuth works, let’s first understand some important terminologies that will be used throughout this blog:
Client Application:
The website or web application that wants to access the user’s data.Resource Owner:
The user whose data the client application wants to access.OAuth Service Provider:
The website or application that controls the user’s data and access to it. These providers support OAuth by offering APIs and handling both the authorization server and resource server.Authorization Server:
The server responsible for authenticating the user and issuing the authorization code and tokens.Resource Server:
The server where the protected data is stored.Access Token:
A short-lived token used by the client to access protected APIs.Refresh Token (Optional):
A long-lived token used to obtain a new access token when the current one expires.Scope:
Specifies the exact data or permissions the client application wants to access.
Let’s understand this better with an example:
Imagine you are using a website called fitmealplanner.com that helps you plan your meals using your fitness and health data from Google Fit.
Here’s how OAuth applies in this scenario:
Client Application
→fitmealplanner.com
This is the third-party web app that wants to access your fitness data from Google Fit to generate a personalized meal plan.Resource Owner
→ You (the user)
You are the owner of your Google Fit data. FitMealPlanner.com needs your permission to access this data.- OAuth Service Provider
→ Google
Google supports OAuth and provides both:- Authorization Server (to handle user login and issue tokens)
- Resource Server (to store and serve your fitness data via APIs)
Authorization Server
→accounts.google.com
When fitmealplanner.com asks for access, you are redirected to Google’s authorization server where you log in and approve the request. If successful, it issues an authorization code (and later, access tokens).Resource Server
→www.googleapis.com/fitness/v1/...
After obtaining the access token, fitmealplanner.com uses it to request your data from Google Fit’s API, which is served by the resource server.Access Token
→ A short lived token like:
ya29.a0ARrdaM9...
This token is used by fitmealplanner.com to call APIs and retrieve your fitness data. It’s included in the HTTP header as:
Authorization: Bearer <access_token>Refresh Token (Optional)
→ A long lived token stored securely by fitmealplanner.com.
When the access token expires, this refresh token can be used to get a new one without requiring you to log in again.- Scope
→ Defines what data or permissions fitmealplanner.com is requesting.
For example, it may request access to your fitness and health data using thescopeparameter in the authorization request.
There are multiple ways in which OAuth can be implemented. These are known as OAuth flows or grant types.
In this blog, we’ll cover a few common ones. The most popular ones are:
- Authorization Code Grant Type
- Implicit Grant Type (Note: Deprecated in OAuth 2.1)
Now, let’s take a closer look at these OAuth flows (grant types) in more detail.
Authorization Code Grant Type
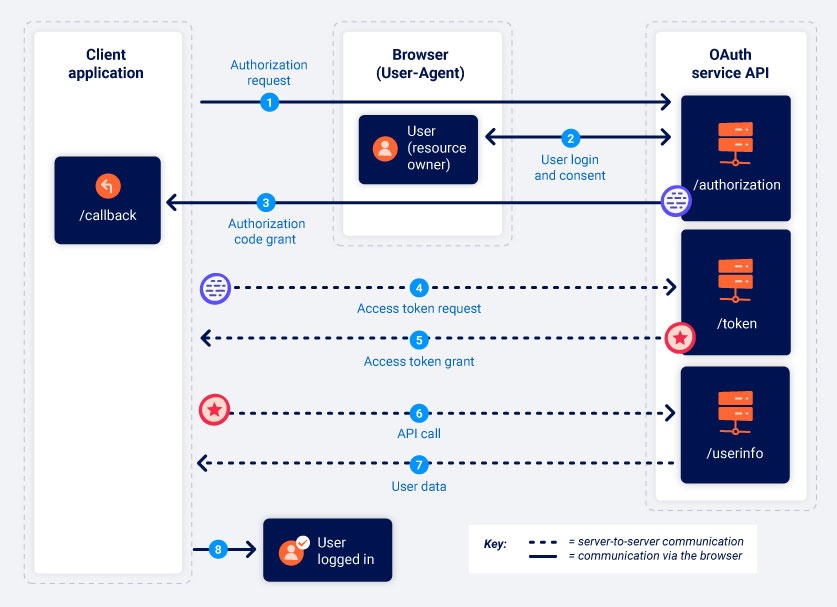
From PortSwigger
The Authorization Code Grant Type in short follows a two-step process:
- The client obtains an authorization code by redirecting the user to the authorization server, where the user authenticates and grants access.
- The client exchanges the authorization code for an access token (and optionally a refresh token) by communicating directly with the authorization server.
Here’s a detailed workflow of it:
Step 1: Client Initiates the Authorization Request
- The user interacts with the client (e.g., clicks a “Log in with Google” button on a web app).
- The client redirects the user’s browser to the authorization server’s authorization endpoint with a URL containing the following query parameters:
response_type=code: Indicates the client is requesting an authorization code.client_id: The client’s unique identifier.redirect_uri: The URI where the authorization server will redirect the user after authorization.scope: The scope of access being requested (e.g.,read_profile,write_email).state(optional but recommended): A random string generated by the client to prevent CSRF (Cross-Site Request Forgery) attacks.- Other optional parameters:
code_challenge(for PKCE, discussed later), etc.
Example Authorization Request URL:
1
2
3
4
5
6
https://authorization-server.com/auth?
  response_type=code&
  client_id=abc123&
  redirect_uri=https://client-app.com/callback&
  scope=read_profile&
  state=xyz789
Step 2: User Authenticates and Grants Consent
- The authorization server presents a login page to the user, where they authenticate (e.g., enter their username and password).
- After authentication, the authorization server displays a consent screen, asking the user to approve or deny the client’s requested access (e.g., “Allow ClientApp to access your profile?”).
- If the user grants consent, the authorization server generates an authorization code.
Step 3: Authorization Server Redirects Back to Client
- The authorization server redirects the user’s browser to the client’s
redirect_uri, appending the following query parameters:code: The authorization code (short-lived, typically valid for a few minutes).state: The samestatevalue sent by the client (to verify the request’s integrity).
Example Redirect URL:
1
2
3
https://client-app.com/callback?
  code=def456&
  state=xyz789
- The client verifies the
stateparameter to ensure it matches the value sent in Step 1, protecting against CSRF attacks.
Step 4: Client Exchanges Authorization Code for Access Token
- The client makes a POST request to the authorization server’s token endpoint to exchange the authorization code for an access token. This request includes:
grant_type=authorization_code: Indicates the grant type being used.code: The authorization code received in Step 3.redirect_uri: The same redirect URI used in Step 1 (for validation).client_id: The client’s identifier.client_secret: The client’s secret (for confidential clients only).code_verifier(optional, for PKCE): Used for public clients (discussed later).
Example Token Request:
1
2
3
4
5
6
7
8
9
POST /token HTTP/1.1
Host: authorization-server.com
Content-Type: application/x-www-form-urlencoded

grant_type=authorization_code&
code=def456&
redirect_uri=https://client-app.com/callback&
client_id=abc123&
client_secret=secret789
Step 5: Authorization Server Issues Access Token
- The authorization server validates the request (e.g., checks the code, client credentials, and redirect URI).
- If valid, it responds with a JSON object containing:
access_token: The token used to access protected resources.token_type: The type of token (usuallyBearer).expires_in: The lifetime of the access token in seconds (e.g., 3600 for 1 hour).refresh_token(optional): A token to obtain a new access token when the current one expires.scope(optional): The granted scope, if different from the requested scope.
Example Token Response:
1
2
3
4
5
6
7
{
  "access_token": "ghi789",
  "token_type": "Bearer",
  "expires_in": 3600,
  "refresh_token": "jkl012",
  "scope": "read_profile"
}
Step 6: Client Accesses Protected Resources
- The client uses the
access_tokento make API requests to the resource server, typically by including it in theAuthorizationheader as a Bearer token.
Example API Request:
1
2
3
GET /user/profile HTTP/1.1
Host: resource-server.com
Authorization: Bearer ghi789
- The resource server validates the access token and, if valid, returns the requested resource (e.g., the user’s profile data).
Step 7: Refreshing the Access Token (Optional)
- If the access token expires and a refresh token was issued, the client can request a new access token by sending a POST request to the authorization server’s token endpoint with:
grant_type=refresh_tokenrefresh_token: The refresh token received earlier.client_idclient_secret(for confidential clients).
Example Refresh Token Request:
1
2
3
4
5
6
7
8
POST /token HTTP/1.1
Host: authorization-server.com
Content-Type: application/x-www-form-urlencoded

grant_type=refresh_token&
refresh_token=jkl012&
client_id=abc123&
client_secret=secret789
- The authorization server responds with a new access token (and possibly a new refresh token).
Example Refresh Token Response:
1
2
3
4
5
6
{
  "access_token": "mno345",
  "token_type": "Bearer",
  "expires_in": 3600,
  "refresh_token": "pqr678"
}
Now that we’ve understood the Authorization Code flow, let’s look at how it can be made more secure for public clients like mobile and SPA applications using PKCE (Proof Key for Code Exchange).
PKCE (Proof Key for Code Exchange)
The Authorization Code Grant Type can be enhanced with PKCE (RFC 7636) to make it more secure, especially for public clients (e.g., single-page apps, mobile apps) that cannot securely store a client secret. PKCE prevents authorization code interception attacks by adding an extra layer of verification.
How PKCE Works
- The client generates a random string called the
code_verifier. - The client creates a
code_challengeby hashing thecode_verifier(e.g., using SHA-256) and includes it in the authorization request withcode_challenge_method=S256. - When exchanging the authorization code for an access token, the client includes the original
code_verifierin the token request. - The authorization server verifies the
code_verifierby hashing it and comparing it to thecode_challengereceived earlier.
Example Authorization Request with PKCE:
1
2
3
4
5
6
7
8
https://authorization-server.com/auth?
  response_type=code&
  client_id=abc123&
  redirect_uri=https://client-app.com/callback&
  scope=read_profile&
  state=xyz789&
  code_challenge=abc123xyz789hashed&
  code_challenge_method=S256
Example Token Request with PKCE:
1
2
3
4
5
6
7
8
9
POST /token HTTP/1.1
Host: authorization-server.com
Content-Type: application/x-www-form-urlencoded

grant_type=authorization_code&
code=def456&
redirect_uri=https://client-app.com/callback&
client_id=abc123&
code_verifier=original-verifier-string
PKCE ensures that even if an attacker intercepts the authorization code, they cannot exchange it for an access token without the code_verifier.
Implicit Grant (Deprecated)
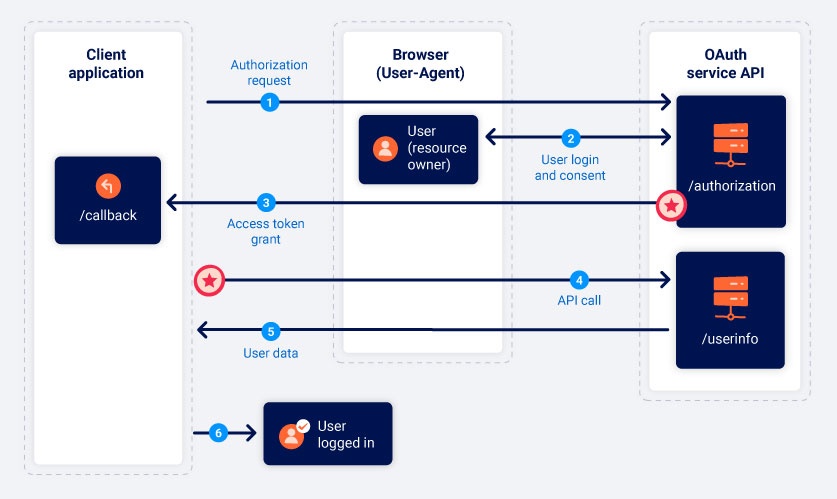
From PortSwigger
The Implicit Grant Type is one of the grant types defined in OAuth 2.0, tailored for clients running in environments where securing a client secret is not feasible.
Unlike the Authorization Code Grant Type, the Implicit Grant does not use:
- A client secret (since it’s designed for public clients).
- An authorization code (the access token is issued directly).
- A refresh token (refresh tokens are not supported in this flow).
Step 1: Client Initiates the Authorization Request
- The user interacts with the client (e.g., clicks a “Log in with Google” button on a single page app).
- The client redirects the user’s browser to the authorization server’s authorization endpoint with a URL containing the following query parameters:
response_type=token: Indicates the client is requesting an access token directly (the key differentiator of the Implicit Grant).client_id: The client’s unique identifier.redirect_uri: The URI where the authorization server will redirect the user after authorization.scope: The scope of access being requested (e.g.,read_profile,write_email).state(optional but recommended): A random string generated by the client to prevent CSRF attacks.
Example Authorization Request URL:
1
2
3
4
5
6
https://authorization-server.com/auth?
  response_type=token&
  client_id=abc123&
  redirect_uri=https://client-app.com/callback&
  scope=read_profile&
  state=xyz789
Step 2: User Authenticates and Grants Consent
- The authorization server presents a login page to the user, where they authenticate (e.g., enter their username and password).
- After authentication, the authorization server displays a consent screen, asking the user to approve or deny the client’s requested access (e.g., “Allow ClientApp to access your profile?”).
- If the user grants consent, the authorization server generates an access token.
Step 3: Authorization Server Redirects Back to Client with Access Token
- The authorization server redirects the user’s browser to the client’s
redirect_uri, appending the access token and other parameters in the URL fragment (not the query string, to prevent the token from being sent to the server automatically). The response includes:access_token: The token used to access protected resources.token_type: The type of token (usuallyBearer).expires_in: The lifetime of the access token in seconds (e.g., 3600 for 1 hour).state: The samestatevalue sent by the client (to verify the request’s integrity).scope(optional): The granted scope, if different from the requested scope.
Example Redirect URL:
1
https://client-app.com/callback#access_token=ghi789&token_type=Bearer&expires_in=3600&state=xyz789
- The access token is included in the URL fragment (after the
#), which is only accessible to the client-side JavaScript and not sent to the server, reducing the risk of token leakage to the server hosting the redirect URI.
While this was intended to reduce token leakage to the server, it ironically introduces new security risks, the token becomes exposed to browser history and any potentially malicious scripts (e.g., via XSS), making it unsuitable for secure applications. This is one of the main reasons why Implicit Grant is deprecated in OAuth 2.1.
- The client verifies the
stateparameter to ensure it matches the value sent in Step 1, protecting against CSRF attacks.
Step 4: Client Extracts the Access Token
- The client (e.g., JavaScript in a single-page app) extracts the access token from the URL fragment using client-side scripting.
- For example, in JavaScript:
1
2
3
4
5
const fragment = new URLSearchParams(window.location.hash.substring(1));
const accessToken = fragment.get('access_token');
const tokenType = fragment.get('token_type');
const expiresIn = fragment.get('expires_in');
const state = fragment.get('state');
Step 5: Client Accesses Protected Resources
- The client uses the
access_tokento make API requests to the resource server, typically by including it in theAuthorizationheader as a Bearer token.
Example API Request:
1
2
3
GET /user/profile HTTP/1.1
Host: resource-server.com
Authorization: Bearer ghi789
- The resource server validates the access token and, if valid, returns the requested resource (e.g., the user’s profile data).
Step 6: No Refresh Tokens
- The Implicit Grant Type does not issue refresh tokens. If the access token expires, the client must restart the authorization process by redirecting the user to the authorization server again.
Client Credentials Grant
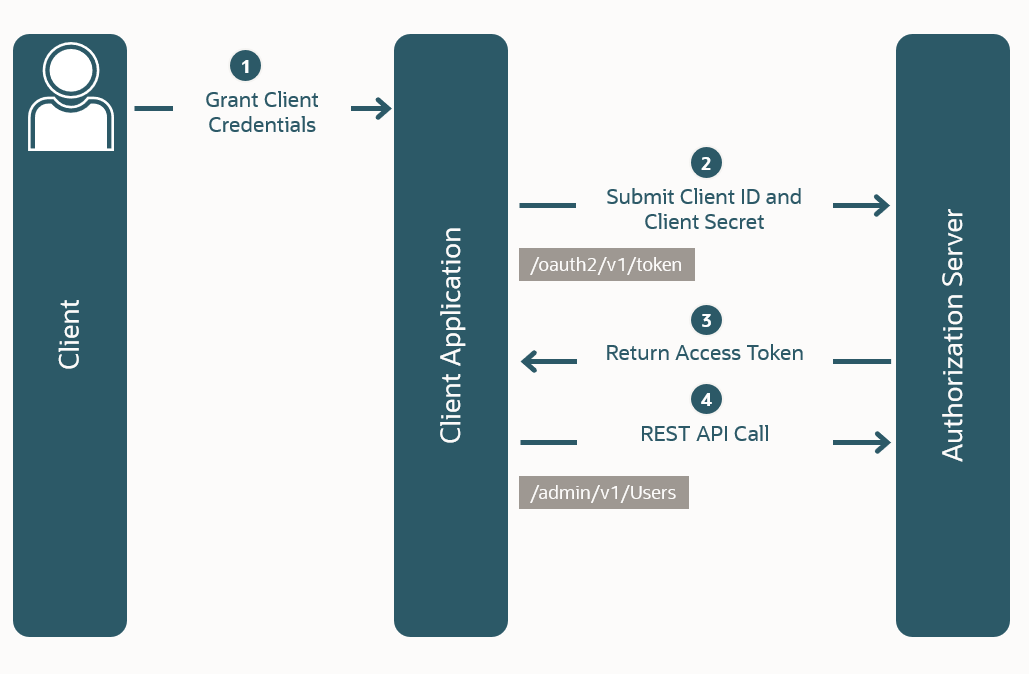
From Oracle
The Client Credentials Grant Type is an OAuth 2.0 grant type designed for machine-to-machine (M2M) communication, where a client application needs to access protected resources without involving a user. It is used when the client itself is the resource owner or when the client is acting on its own behalf, such as accessing its own APIs or resources on a resource server.
Unlike other OAuth 2.0 grant types (e.g., Authorization Code or Implicit), the Client Credentials Grant does not involve:
- A resource owner (user), as there is no user interaction.
- A redirect URI, since the flow does not involve browser redirects.
- An authorization code, as the access token is issued directly.
- A refresh token, as access tokens are typically short-lived, and the client can request a new one directly.
Step 1: Client Authenticates and Requests an Access Token
- The client sends a POST request to the authorization server’s token endpoint to obtain an access token. The request includes:
grant_type=client_credentials: Indicates the Client Credentials Grant Type.client_id: The client’s unique identifier.client_secret: The client’s secret for authentication (required for confidential clients).scope(optional): The scope of access being requested (e.g.,read_metrics,write_data).
- The client authenticates itself using one of the following methods:
- Including the
client_idandclient_secretin the request body (common). - Using HTTP Basic Authentication, where the
client_idandclient_secretare encoded in theAuthorizationheader. - Other methods like client assertion (e.g., using a JWT) as supported by the authorization server.
- Including the
Example Token Request (Using Request Body):
1
2
3
4
5
6
7
8
POST /token HTTP/1.1
Host: authorization-server.com
Content-Type: application/x-www-form-urlencoded

grant_type=client_credentials&
client_id=abc123&
client_secret=secret789&
scope=read_metrics
Example Token Request (Using Basic Authentication):
1
2
3
4
5
6
7
POST /token HTTP/1.1
Host: authorization-server.com
Authorization: Basic YWJjMTIzOnNlY3JldDc4OQ== (Base64-encoded "abc123:secret789")
Content-Type: application/x-www-form-urlencoded

grant_type=client_credentials&
scope=read_metrics
Step 2: Authorization Server Validates and Issues Access Token
- The authorization server validates the client’s credentials (
client_idandclient_secret). - It checks whether the client is authorized to request the specified
scope(if provided). - If the request is valid, the authorization server responds with a JSON object containing:
access_token: The token used to access protected resources.token_type: The type of token (usuallyBearer).expires_in: The lifetime of the access token in seconds (e.g., 3600 for 1 hour).scope(optional): The granted scope, if different from the requested scope.
Example Token Response:
1
2
3
4
5
6
{
  "access_token": "ghi789",
  "token_type": "Bearer",
  "expires_in": 3600,
  "scope": "read_metrics"
}
Step 3: Client Accesses Protected Resources
- The client uses the
access_tokento make API requests to the resource server, typically by including it in theAuthorizationheader as a Bearer token.
Example API Request:
1
2
3
GET /metrics HTTP/1.1
Host: resource-server.com
Authorization: Bearer ghi789
- The resource server validates the access token (e.g., by introspecting it with the authorization server or verifying its signature if it’s a JWT) and, if valid, returns the requested resource (e.g., system metrics).
Step 4: Requesting a New Access Token (If Expired)
- The Client Credentials Grant does not issue refresh tokens. If the access token expires, the client simply repeats the process by sending a new token request to the authorization server with its credentials.
- Since the flow is automated and does not involve user interaction, this is typically straightforward.
Resource Owner Password Credentials Grant
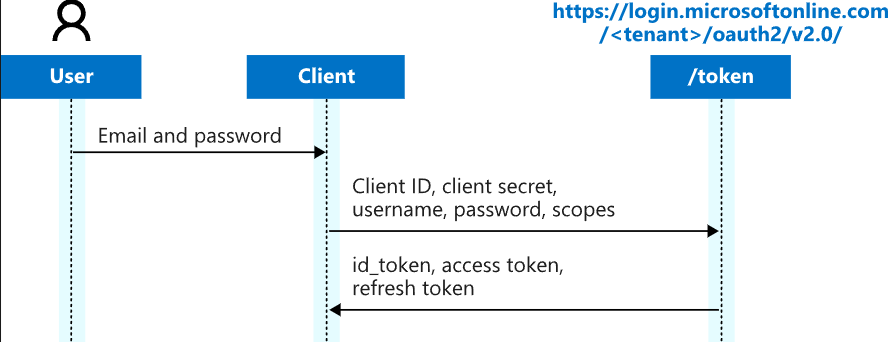
From Microsoft
The Resource Owner Password Credentials Grant Type (often referred to as the Password Grant) is an OAuth 2.0 grant type that allows a client application to obtain an access token by directly using the resource owner’s (user’s) credentials, typically a username and password. This grant type is designed for scenarios where the client is highly trusted by the resource owner, such as first-party applications (e.g., a company’s own applications or mobile app accessing its own API). However, due to significant security concerns, it is considered deprecated in OAuth 2.1 and is only recommended for use in specific, controlled environments where other grant types (e.g., Authorization Code Grant with PKCE) are not feasible.
Unlike the Authorization Code Grant, the Resource Owner Password Grant Type does not involve:
A redirect URI, as there are no browser-based redirects. An authorization code, since the access token is issued directly. User interaction with the authorization server’s consent screen, as the client collects the user’s credentials.
Step 1: Client Collects User Credentials
- The client prompts the user to enter their username and password, typically through a login form in the application (e.g., a mobile app or desktop application login screen).
- The client securely handles these credentials and prepares to send them to the authorization server.
Step 2: Client Requests an Access Token
- The client sends a POST request to the authorization server’s token endpoint, including the user’s credentials and its own authentication details. The request includes:
grant_type=password: Indicates the Resource Owner Password Credentials Grant Type.username: The resource owner’s username or identifier.password: The resource owner’s password.client_id: The client’s unique identifier.client_secret(optional): Required for confidential clients to authenticate themselves.scope(optional): The scope of access being requested (e.g.,read_profile).
- The client may authenticate itself using:
- The
client_idandclient_secretin the request body. - HTTP Basic Authentication with the
client_idandclient_secretin theAuthorizationheader. - Other methods supported by the authorization server.
- The
Example Token Request (Using Request Body):
1
2
3
4
5
6
7
8
9
10
POST /token HTTP/1.1
Host: authorization-server.com
Content-Type: application/x-www-form-urlencoded

grant_type=password&
username=user@example.com&
password=pass123&
client_id=abc123&
client_secret=secret789&
scope=read_profile
Example Token Request (Using Basic Authentication):
1
2
3
4
5
6
7
8
9
POST /token HTTP/1.1
Host: authorization-server.com
Authorization: Basic YWJjMTIzOnNlY3JldDc4OQ== (Base64-encoded "abc123:secret789")
Content-Type: application/x-www-form-urlencoded

grant_type=password&
username=user@example.com&
password=pass123&
scope=read_profile
Step 3: Authorization Server Validates and Issues Access Token
- The authorization server validates:
- The user’s
usernameandpasswordagainst its authentication system. - The client’s credentials (
client_idandclient_secret, if provided). - The requested
scope, ensuring the client is authorized for the specified access.
- The user’s
- If the request is valid, the authorization server responds with a JSON object containing:
access_token: The token used to access protected resources.token_type: The type of token (usuallyBearer).expires_in: The lifetime of the access token in seconds (e.g., 3600 for 1 hour).refresh_token(optional): A token to obtain a new access token when the current one expires.scope(optional): The granted scope, if different from the requested scope.
Example Token Response:
1
2
3
4
5
6
7
{
  "access_token": "ghi789",
  "token_type": "Bearer",
  "expires_in": 3600,
  "refresh_token": "jkl012",
  "scope": "read_profile"
}
Step 4: Client Accesses Protected Resources
- The client uses the
access_tokento make API requests to the resource server, typically by including it in theAuthorizationheader as a Bearer token.
Example API Request:
1
2
3
GET /user/profile HTTP/1.1
Host: resource-server.com
Authorization: Bearer ghi789
- The resource server validates the access token (e.g., via introspection or JWT verification) and, if valid, returns the requested resource (e.g., the user’s profile data).
Step 5: Refreshing the Access Token (Optional)
- If a
refresh_tokenwas issued, the client can use it to request a new access token when the current one expires by sending a POST request to the token endpoint with:grant_type=refresh_tokenrefresh_token: The refresh token received earlier.client_idclient_secret(for confidential clients).
Example Refresh Token Request:
1
2
3
4
5
6
7
8
POST /token HTTP/1.1
Host: authorization-server.com
Content-Type: application/x-www-form-urlencoded

grant_type=refresh_token&
refresh_token=jkl012&
client_id=abc123&
client_secret=secret789
- The authorization server responds with a new access token (and possibly a new refresh token).
Example Refresh Token Response:
1
2
3
4
5
6
{
  "access_token": "mno345",
  "token_type": "Bearer",
  "expires_in": 3600,
  "refresh_token": "pqr678"
}
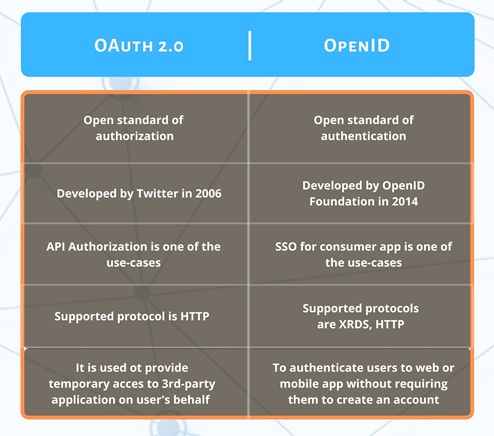
Now that we’ve seen in detail how OAuth 2.0 works and explored its common grant types, it’s also important to briefly touch on a related concept which is OpenID Connect (OIDC).
OAuth 2.0 and OpenID Connect (OIDC) are closely related but serve different purposes. OAuth 2.0 is an authorization framework, whereas OIDC is an authentication protocol built on top of OAuth 2.0.
A key difference is that OAuth 2.0 does not handle user identity and it only deals with granting access to resources. If you’re using a feature like “Login with Google,” what you’re actually using is OpenID Connect, not plain OAuth. OIDC extends OAuth 2.0 by adding an identity layer, allowing clients to verify the identity of the user and retrieve basic profile information.
From hitechnectar.com
We’ll dive deeper into OpenID Connect and how it works in a future blog post.
Now that we’ve covered the internals of OAuth 2.0 and the grant types, let’s take a look at some best practices you should follow while implementing OAuth and the reasons why they matter.
Best Practices
- The most important thing is choosing the appropriate grant type based on the application type and use case. For example,
- Authorization Code Grant (with PKCE) - Best for Web apps, mobile apps, single-page applications (SPAs)
- Client Credentials Grant - Best for machine-to-machine (M2M) communication(like microservices accessing APIs).
- Avoid deprecated flows like implicit grant type, resource owner password credentials grant type etc.
- Proper Client Configuration
- It includes providing accurate
redirect_urivalues for flows like Authorization Code, using exact, fully qualifiedredirect_uri(e.g.,https://client-app.com/callback) and avoid wildcards (e.g.,https://*.client-app.com). - The authorization server must strictly validate the
redirect_urito prevent attacks. - Store the
client_secretsecurely.
- It includes providing accurate
- Use
stateparameter to prevent CSRF- The
stateparameter is a random string sent in the authorization request and returned in the redirect to prevent Cross-Site Request Forgery (CSRF) attacks.
- The
- Limiting Scopes
- It follows the principle of least privilege, reducing the impact of a compromised token.
- Secure Token Storage and Transmission
- Store access token securely, never store them in browser local storage or session storage and transmit them only over HTTPS.
- Use Short Lived Access Tokens
- Use of short lived access tokens reduce the window of opportunity for misuse if compromised.
- There are many more best practices like validate tokens, implement token revocation if they are compromised or no longer needed etc.
Final Thoughts
That’s it for this one.
I hope this blog helped you get a solid understanding of what OAuth 2.0 is, how it works and the key concepts behind it.
If anything felt confusing or you think I missed something, feel free to drop a message or comment. I’m still learning too, so if you spot anything wrong or have suggestions to improve this write-up, feel free to reach out. Feedback is always welcome and helps us grow together.
Next up, I’ll cover the security side of OAuth (the vulnerabilities, common mistakes and how attackers exploit them). That’s where things get really interesting.
If you’re into cyber security or just getting started, follow Security Mates for more write-ups and breakdowns like this.
Until next time - Stay Curious and Stay Secure! 🔐