Linux System Administration Essentials (Part 3): Package Management, Kernel Updates and System Monitoring
In this part of the Linux System Administration Essentials series, we explore critical administrative tasks, including managing software packages with package managers like APT and DNF, performing kernel updates, handling system reboots, analyzing log files for troubleshooting and monitoring system performance.
Introduction
In the previous parts of our Linux System Administration Essentials series, we explored foundational concepts like file systems, user management, and permissions. If you haven’t checked them yet, I highly recommend starting there:
- Part 1: Linux System Administration Essentials (Part 1): Introduction
- Part 2: Linux System Administration Essentials (Part 2): Disk Partitioning, User Management and Network Configuration
In this third part, we’ll dive deeper into essential administrative tasks, including:
- Package Management with APT and DNF
- Kernel Updates and System Reboots
- Log File Analysis and Troubleshooting
- Monitoring System Performance
Understanding these concepts will empower you to efficiently manage software, handle system updates, analyze system behavior, and monitor performance metrics.
Package Management with APT and DNF
What is a Package?
A package in Linux is a collection of files that make up a program or software. A package contains all the files a program needs to run, such as executable files, libraries, configuration files etc. It also includes details on how to install or remove the software, like where the files should go on your system.
What is a Package Manager?
These are tools which are used by linux to manage the packages. Common package managers include apt, yum and pacman. These package managers allows us to install, update or remove packages easily.
Linux Distributions and Package Managers
| Distribution | Package Manager | Package Format |
|---|---|---|
| Ubuntu/Debian | APT | .deb |
| Fedora | DNF | .rpm |
| RHEL/CentOS | YUM/DNF | .rpm |
| Arch Linux/Manjaro | pacman | .pkg.tar.xz |
| openSUSE | Zypper | .rpm |
| Slackware | slackpkg | .tgz |
| Alpine Linux | apk | .apk |
Tasks of a Package Manager:
- Installation: To download and install software packages from repositories or local files.
- Updates: To keep software up-to-date.
- Dependencies: To ensure that all required dependencies are installed when u install a program.
- Removal: To help in uninstalling the software and related files.
You might be wondering that from where does these package managers get all these packages? It’s from package repositories.
Package Repositories:
A repository is a centralized storage location where all packages are stored. There are typically two types of repositories:
- Official repositories: Provided and maintained by the distribution maintainers (e.g., Ubuntu’s official repository).
- Third-party repositories: Software developers or third-party organizations can host their own repositories for additional software not included in the official ones.
Package Installation Process:
Here’s an overview of what happens during installation of a package via package manager.
- Package manager checks the dependencies of package & installs them.
- Package manager downloads the package from repository.
- Package manager installs the software.
- Package manager configures if anything needed to.
- Package manager updates its local database of installed software.
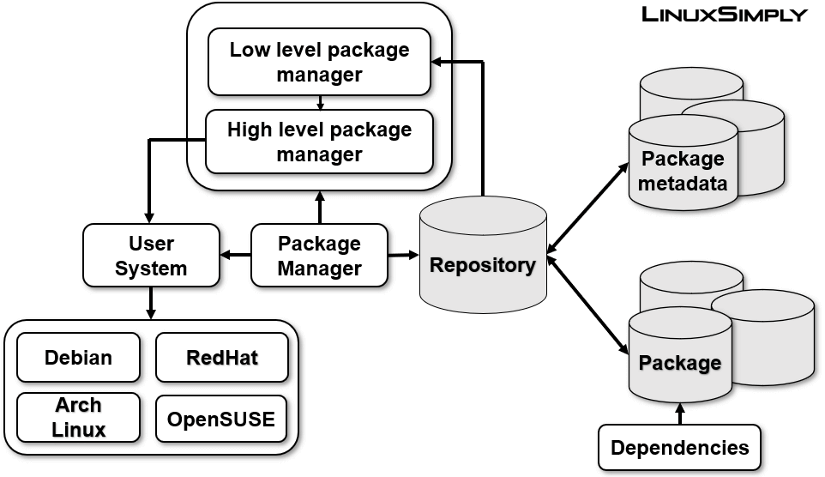
How package manager works from linuxsimply
APT (Advanced Package Tool)
APT is the most widely used package manager for Debian-based distributions, such as Ubuntu. It manages .deb files and interacts seamlessly with repositories.
Common APT Commands:
apt install <package-name>: Installs a package.apt remove <package-name>: Uninstalls a package (retains configuration files).apt purge <package-name>: Completely removes a package (including configuration files).apt update: Updates the package list from repositories.apt upgrade: Upgrades installed packages to their latest versions.apt full-upgrade: Resolves dependencies by installing or removing packages as needed.apt autoremove: Removes unnecessary packages.apt search <package-name>: Searches for a package.apt show <package-name>: Displays detailed package information.apt list --installed: Lists all installed packages.
Common apt-get commands:
apt-get update– Updates the list of available packages from the repository.apt-get upgrade– Upgrades all installed packages to the latest versions.apt-get dist-upgrade– Likeapt-get upgradebut can install or remove packages to satisfy dependencies.apt-get install <package-name>– Installs a package.apt-get remove <package-name>– Removes a package.apt-get purge <package-name>– Completely removes a package (including its configuration files).
In short the difference between apt & apt-get which you should know is
aptis easier, cleaner, and meant for regular users.apt-getis more detailed, suitable for advanced users and automation scripts.
apt-cache Command:
apt-cache is used to query information about available packages, like searching for packages, showing package details, or checking dependencies.
Common apt-cache commands:
apt-cache search <package-name>– Searches for a package by name or description.apt-cache show <package-name>– Shows detailed information about a package, including dependencies.apt-cache depends <package-name>– Lists the dependencies for a given package.apt-cache rdepends <package-name>– Lists packages that depend on a given package.
Working of APT:
APT relies on repositories to find software packages. The list of repositories is stored in the system’s /etc/apt/sources.list file, or in files inside the /etc/apt/sources.list.d/ directory. These files specify the locations (URLs) of the repositories.
For example, a typical entry in the sources.list might look like this:
1
2
deb http://archive.ubuntu.com/ubuntu/ focal main restricted universe multiverse
deb-src http://archive.ubuntu.com/ubuntu/ focal main restricted universe multiverse
Package Installation and Dependencies:
When installing a package with APT (e.g., sudo apt install <package-name>), the following steps occur:
- Search for the package: APT searches the repository index to find the package.
- Check dependencies: APT checks if the package has any dependencies that aren’t installed yet.
- Download the package: If the package and its dependencies are found, APT downloads the required
.debfiles. - Install the package: APT installs the package, placing the files in the appropriate directories (e.g., binaries in
/usr/bin, configuration files in/etc). - Post-installation configuration: Some packages require configuration steps after installation, which APT handles automatically.
APT will also take care of removing packages that are no longer needed (using apt autoremove) and cleaning up the system.
Package Management Workflow with APT:
Here’s a typical workflow for managing packages with APT:
1. Updating the Package List:
Before installing or upgrading packages, it’s important to update the local package index to ensure you are getting the latest version of software.
1
sudo apt update
2. Installing Software:
To install a package, use:
1
sudo apt install <package-name>
APT will download and install the package, along with any required dependencies.
3. Upgrading Software:
To upgrade installed software packages, run:
1
sudo apt upgrade
This command will upgrade all installed packages to the latest version available in the repositories.
To upgrade the entire system, including dependencies and other changes that may require removing or installing new packages, use:
1
sudo apt full-upgrade
4. Removing Software:
To remove a package, use:
1
sudo apt remove <package-name>
This will uninstall the package but leave its configuration files intact.
To completely remove a package (including configuration files), use:
1
sudo apt purge <package-name>
5. Cleaning Up:
Over time, unused packages and cache files accumulate. To remove these, use:
sudo apt autoremove– Removes unnecessary dependencies that are no longer required.sudo apt clean– Clears the package cache, freeing up disk space.
DNF (Dandified YUM)
DNF is the successor to YUM (Yellowdog Updater Modified) and represents the next-generation package manager designed to be faster, more reliable, and efficient. It manages software packages by automating tasks like installation, removal, updates, and dependency resolution.
Key DNF Commands
dnf install <package-name>: Installs a package.dnf remove <package-name>: Uninstalls a package from the system.dnf update: Updates all installed packages.dnf upgrade: Upgrades packages and resolves any dependency changes.dnf search <package-name>: Searches repositories for a specific package.dnf info <package-name>: Displays detailed information about a package.dnf list installed: Lists all installed packages.dnf clean all: Cleans cached files and metadata.dnf groupinstall <group-name>: Installs a group of related packages (e.g.,dnf groupinstall "Development Tools").dnf history: Reviews or rolls back transaction history.
Working of DNF
Like YUM, DNF relies on repositories for finding and installing software packages. These repositories are configured in the system’s /etc/yum.repos.d/ directory, where .repo files specify the URLs and settings for each repository. The DNF package manager downloads package metadata, resolves dependencies, and handles transactions to install or remove packages on the system.
Example of a DNF repository configuration (/etc/yum.repos.d/):
1
2
3
4
5
6
[base]
name=CentOS-$releasever - Base
baseurl=http://mirror.centos.org/centos/$releasever/os/x86_64/
enabled=1
gpgcheck=1
gpgkey=http://mirror.centos.org/centos/RPM-GPG-KEY-CentOS-7
Package Installation and Dependencies:
When you install a package using DNF (e.g., sudo dnf install <package-name>), the following process occurs:
- Package Search: DNF queries the repository for the package name.
- Dependency Check: DNF checks the dependencies required by the package and ensures they are installed.
- Download: If the package and its dependencies are available, DNF downloads them.
- Installation: DNF installs the package and its dependencies, placing files in appropriate directories (e.g., executables in
/usr/bin, libraries in/usr/lib). - Post-installation: Some packages may require additional configuration, which DNF will attempt to handle automatically.
Package Management Workflow with DNF
Here’s a typical workflow for managing packages using DNF:
1. Updating the Package List:
Before installing or upgrading packages, it is important to update the local package index to ensure you are getting the latest versions of software available in the repositories.
1
sudo dnf update
2. Installing Software:
To install a package, use the following command:
1
sudo dnf install <package-name>
This command will download and install the package, along with any dependencies that are needed.
3. Upgrading Software:
To upgrade all installed packages to their latest versions, run:
1
sudo dnf upgrade
This command will upgrade installed packages to their latest available versions from the repositories.
To upgrade specific packages, you can specify the package name:
1
sudo dnf upgrade <package-name>
4. Removing Software:
To remove a package, use:
1
sudo dnf remove <package-name>
This will uninstall the specified package and, if no other packages depend on it, remove its dependencies.
To clean up unused packages that were installed as dependencies but are no longer required, you can use:
1
sudo dnf autoremove
To remove a package without its dependencies, you can use the remove command with the --noautoremove flag.
5. Grouping and Modular Packages:
DNF also supports group installations (installing a set of related packages), and modular software versions:
1
sudo dnf groupinstall "Development Tools"
This command will install a predefined group of related packages like compilers, libraries, and tools.
For managing specific versions of software (e.g., multiple versions of Python), you can use DNF’s module support:
1
sudo dnf module install python:3.9
This will install a specific version of the Python module (in this case, Python 3.9).
Kernel Updates and System Reboots
Kernel updates refer to the process of upgrading or modifying the core part of the Linux operating system—called the kernel—which interacts directly with the hardware and provides essential system services.
Some of the reasons why kernel updates are important:
- Security Patches
- Hardware Support
- Bug Fixes
- Feature Enhancements
- Performance Improvements
Steps involved in Kernel Update:
1. Check Current Kernel Version
1
   uname -r
2. Check for Available Updates
Debian/Ubuntu-based systems: Use apt or apt-get to update the kernel. For example:
1
2
3
   sudo apt update
   sudo apt upgrade
   sudo apt dist-upgrade
To check for the latest available kernel:
1
   sudo apt-cache search linux-image
3. Install New Kernel Version
1
   sudo apt install linux-image-<version>
4. Reboot the System
After the kernel update is installed, the system must be rebooted to load the new kernel. You can reboot the system by using:
1
   sudo reboot
5. Post-update cleanup
Once the kernel has been updated, there may be old kernels left on the system. It’s a good practice to clean up unnecessary kernels to free up disk space. This can be done with:
1
   sudo apt autoremove
System Reboots
A system reboot is the process of restarting a computer, where the operating system and all active processes are halted, and the system is initialized again from the beginning.
System reboots are necessary for following reasons:
- Kernel Updates
- Configuration Changes
- Hardware changes
- Troubleshooting
- Software Updates
- Memory/Resource Cleanup
- Recovery from Crashes
Process of System Reboot:
- When a reboot is initiated, the system first starts shutting down processes.
- Once the processes are stopped, the system begins unmounting file systems.
- After unmounting file systems and stopping all user processes, the kernel starts terminating its own services.
- Once all services and processes are stopped, the system proceeds with the reboot operation.
- Once the system restarts, the bootloader (commonly GRUB) comes into play.
- The Linux kernel is loaded into memory, and it starts the initialization process
- Systemd(default system & service manager) starts essential system services, mounts file systems, and initializes networking.
- System starts running user applications, background services, and network interfaces.
Log File Analysis and Troubleshooting
Log file analysis is one of the primary tasks for a Linux system administrator to monitor system health, troubleshoot issues, and identify potential security concerns. Logs provide detailed records of system events, software activity, and errors that occur in the operating system and its applications.
Types of Log Files in Linux
Linux stores log files in the /var/log directory. Some of the most commonly analyzed log files include:
- System Logs:
/var/log/syslogor/var/log/messages: General system logs that record system events, startup messages, kernel activities, and user-level operations./var/log/dmesg: Kernel ring buffer logs, useful for diagnosing hardware-related issues, especially at boot time.
- Authentication Logs:
/var/log/auth.logor/var/log/secure: Logs related to user authentication, including login attempts, sudo usage, and SSH access. Crucial for security analysis.
- Application Logs:
/var/log/apache2/or/var/log/nginx/: Web server logs, including access logs, error logs, and more./var/log/mysql/: MySQL/MariaDB logs for database activity, errors, and performance.
- Cron Logs:
/var/log/cron: Logs of scheduled tasks that are executed bycron.
- Systemd Logs:
- With
systemd, logs are stored in the journal and can be accessed usingjournalctl. These logs provide a more comprehensive view of all system activities, including service starts, stops, failures, and boot events.
- With
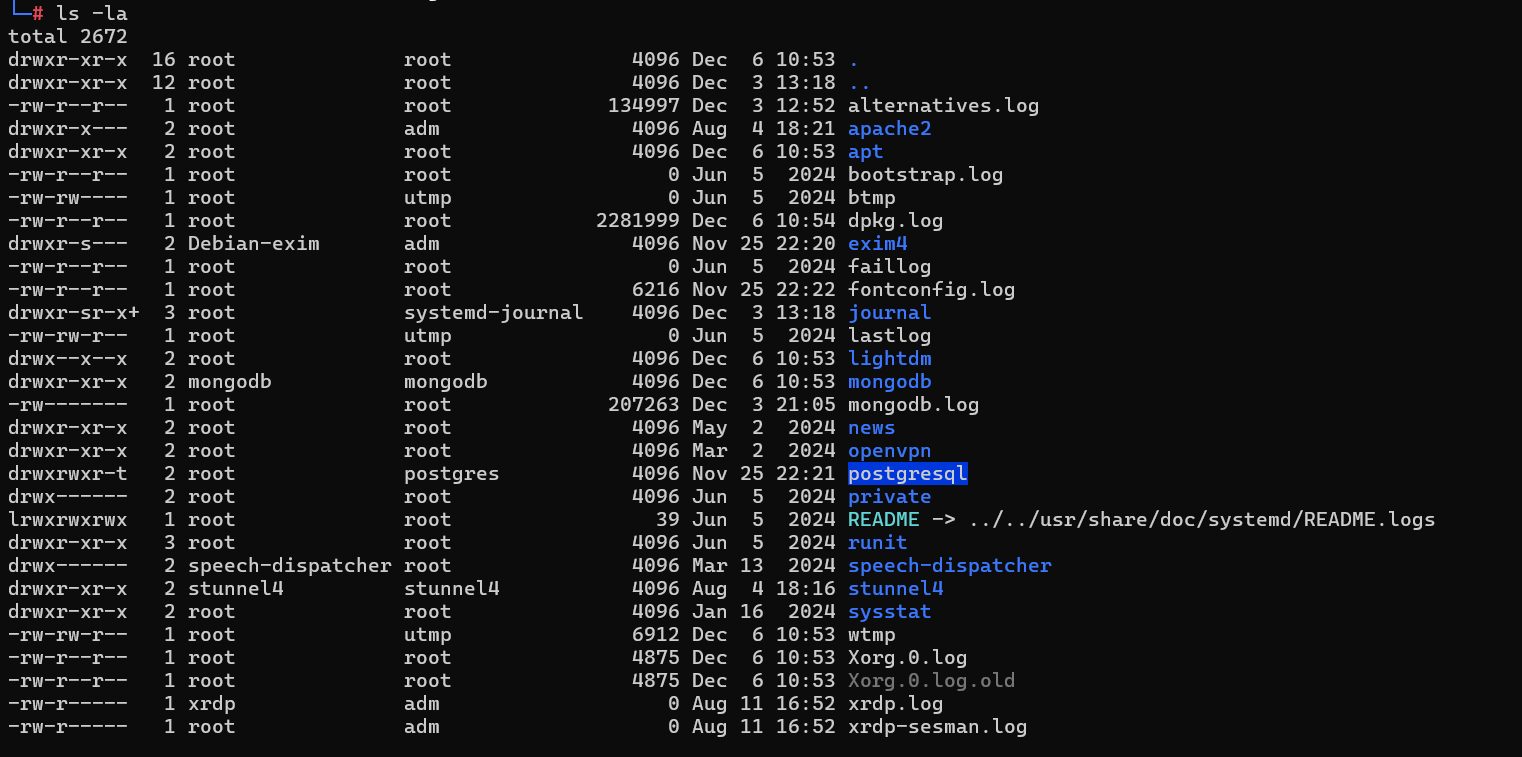
Different log files in linux
Log File Analysis Techniques
To effectively analyze and troubleshoot issues using logs, here are some essential techniques:
- Use Command-Line Tools:
cat,less,more: Simple tools to view log contents.grep: For searching through logs for specific keywords or error codes.1
grep "error" /var/log/syslog
tail: View the last few lines of a log file, useful for real-time monitoring.1
tail -f /var/log/syslog
journalctl: Used withsystemdfor viewing logs across services.1
journalctl -xe
- Look for Errors, Warnings, and Failures:
- Check for specific keywords such as error, failed, warning, critical, and fatal. These often indicate issues.
1
grep -i "failed" /var/log/syslog
- In authentication logs, look for repeated failed login attempts, which may indicate potential security threats.
- Check for specific keywords such as error, failed, warning, critical, and fatal. These often indicate issues.
- Correlate Logs with Events:
- Identify the timestamp of an issue and correlate that with the entries in system logs. This can help pinpoint the root cause of failures or anomalies.
- Monitor Log File Growth:
- Large log files can sometimes indicate excessive errors or issues in the system. Use tools like
logrotateto manage log rotation and archiving.
- Large log files can sometimes indicate excessive errors or issues in the system. Use tools like
- Security Auditing:
- Audit logs to detect suspicious activities such as unauthorized access attempts, privilege escalations, or any unexpected system changes.
- Use
auditdand/var/log/audit/audit.logfor detailed audit logs that track system-level events.
Troubleshooting with Logs
- Identify System Failures: Look for critical errors in system logs that indicate hardware failures (e.g., disk errors, memory issues) or software crashes.
- Service Failures: When a service crashes, check its respective logs (e.g., Apache logs or MySQL logs) for errors.
- Network Issues: Use logs to identify networking problems (e.g., failed connections or DNS resolution issues).
- Authentication Issues: Failed login attempts, unauthorized access, or misconfigurations in
/var/log/auth.logcan indicate security problems.
Monitoring System Performance in Linux
Monitoring system performance is a critical aspect of Linux system administration to ensure that the system is running efficiently, avoid bottlenecks, and prevent downtime. System performance monitoring helps administrators detect issues such as high CPU usage, memory exhaustion, disk I/O bottlenecks, or network congestion.
Key Metrics to Monitor
- CPU Usage:
- High CPU usage can indicate inefficient processes, application overload, or resource-intensive tasks.
- Key metrics:
- User: CPU time spent running user processes.
- System: CPU time spent running system processes.
- Idle: Time the CPU spends idle.
- Memory Usage:
- Ensuring the system has enough free memory for applications is crucial.
- Key metrics:
- Used Memory: Amount of memory in use.
- Free Memory: Available memory for processes.
- Swap Usage: If the system starts using swap space, it could indicate a lack of RAM.
- Disk I/O:
- Disk I/O can impact system performance, especially for applications relying on frequent disk access.
- Key metrics:
- Read/Write Speed: How quickly data is being read from or written to the disk.
- Disk Queue Length: The number of I/O requests waiting in the queue.
- Network Performance:
- Monitoring network interfaces ensures that the system can handle traffic appropriately and detect any network congestion.
- Key metrics:
- Inbound/Outbound Traffic: Data sent and received.
- Packets Sent/Received: Number of packets transmitted.
- Errors and Dropped Packets: Indicate network issues or congestion.
- Process and Service Monitoring:
- It’s essential to keep track of the processes running on the system and ensure no runaway processes are consuming excessive resources.
Tools for Monitoring System Performance
top: Displays real-time information about system processes, CPU usage, memory usage, and more.1
top
- Shows a list of processes sorted by resource usage.
- Press
Shift + Pto sort by CPU usage orShift + Mfor memory.
htop: An enhanced version oftopwith a more user-friendly interface for monitoring system processes and resources.1
htop
- Allows filtering and searching for processes, and supports process management.
vmstat: Provides information about system processes, memory, paging, block I/O, traps, and CPU activity.1
vmstat 1
iostat: Used to monitor CPU and disk I/O performance.1
iostat -x 1free: Shows memory usage, including free and used memory and swap space.1
free -hnetstat: Displays network connections, routing tables, interface statistics, and more.1
netstat -tulnsar: Part of the sysstat package, provides historical data on system performance (CPU, memory, I/O, network).1
sar -u 1 3nmon: A performance monitoring tool that collects detailed data on CPU, memory, disk, network, and more, and generates reports.1
nmon
systemdTools:systemctl status <service>: To monitor the status of system services.journalctl: For viewing logs from systemd-managed services.
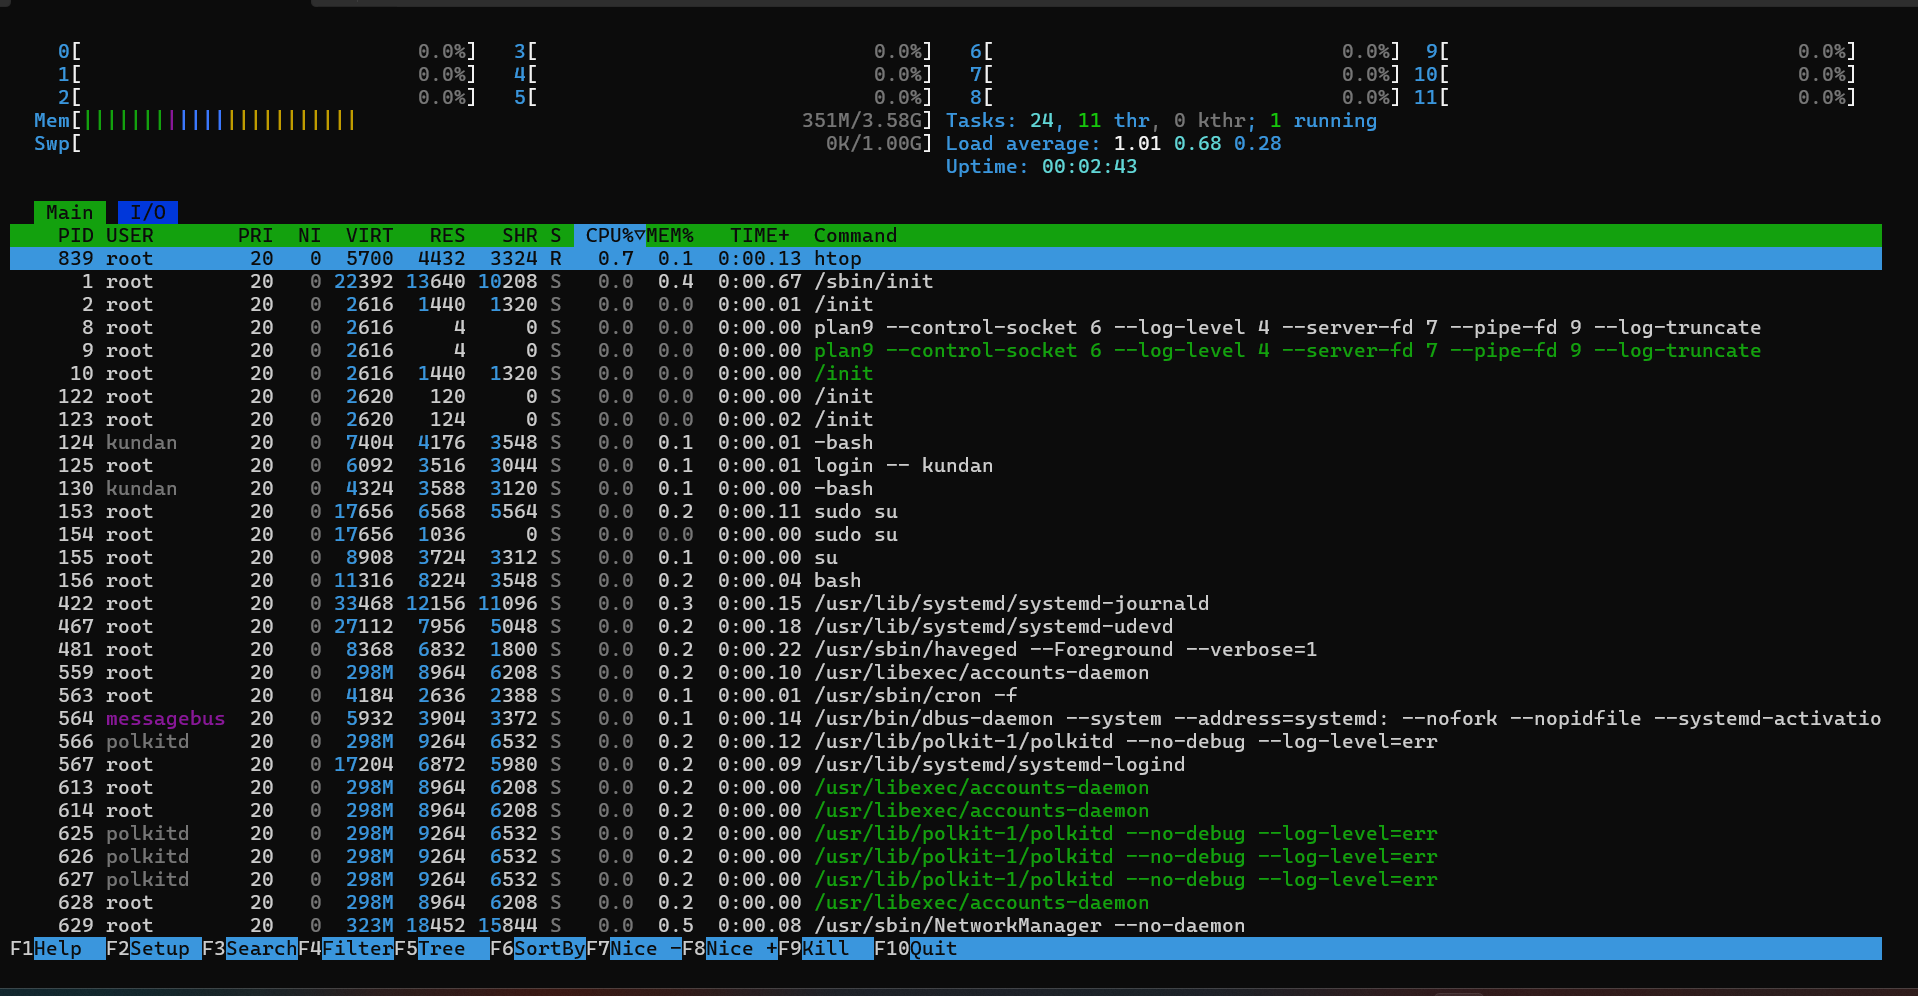
Output of htop command
Final Thoughts
Kernel updates, system reboots, log file analysis, and performance monitoring are crucial skills for effective Linux System Administration. Mastering these topics will empower you to maintain a stable and secure Linux environment.
If you have any questions or need further clarification on any of the topics covered, feel free to reach out! Keep an eye out for more exciting future blogs on a variety of topics!